IMPORTANT: We are not currently connecting any new customers. If you previously linked during the BETA phase of the anesthetic monitor integration, that program has been discontinued. Please be aware that our support team can only assist with how-to questions. Unfortunately, we can no longer provide technical assistance for issues encountered aside from the steps documented here: Troubleshooting: What if the surgery monitor is not working properly? Additionally, we no longer provide technical support for the Surgery Admin panel issues. Any other connection difficulties you will need to contact your IT services to resolve them.
__________________
In order to set up your SurgiVet monitor integration with SmartFlow correctly, please acquire the necessary data using real-time numeric (CSV or Comma Separated value) serial output protocol, by following the steps below:
For the SurgiVet monitor, there is no need to set an IP Address because this monitor is based on the Serial Port.
Please note if you use a laptop or don't have a Serial Port on your PC, you can use a USB serial converter.
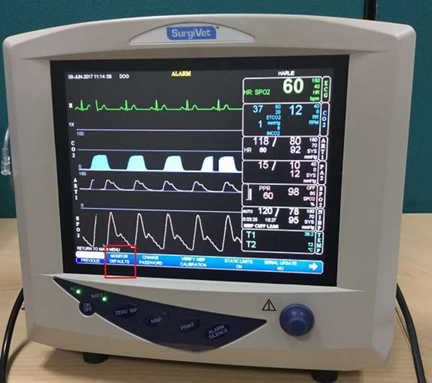
1. Turn the rotary knob on the monitor to move the cursor. Highlight SETUP and push the knob to access the setup menu:

2. Highlight SERVICE MENU and push the knob to select:

3. Turn the rotary knob to access the password box and push the knob to select the first character field:

4. Turn the rotary knob to highlight the desired character and push the knob to select:

Push the knob to select the next character field
Turn the rotary knob to highlight the desired character and push the knob to select
Highlight ENTER and push the knob to select
NOTE: The factory-installed password is ADVISOR.
5. On the service menu, highlight Monitor Defaults and push the knob to select:
6. Highlight SERIAL OUTPUT MODE and push the knob to select.
7. Turn the rotary knob to highlight Real-Time Numeric (CSV) and push the knob to select:

8. Connect a serial cable (DB-9) to the back of the monitor and to a serial COM port on your PC.
9. You will need to confirm the connection with the monitor first through running Hyperterminal or some similar serial communications program:
a) On your PC, open Hyperterminal or a similar serial communications program:

b) In the Name field enter any connection name and click on the OK button:

c) Once you click OK, another window will be displayed. Here in the Connect using drop-down menu, the COM1 is already selected, so leave it as is and click the OK button:

d) Then a window will open to configure the program, please set values as described below:
Bits per second (baud): 115,200
Data bits: 8
Parity: None
Stop bits: 1
Flow control: None


