How can I manage my patient discharge documents?
Print
Modified on: Thu, 16 Jul, 2020 at 5:14 AM
In the Documents Management menu of your manager account settings, you can configure what documents you want to store after the patient is discharged:

From here, you can set up the automatic upload of discharge documents to your PIMS (formerly called EMR), send them to an email, or save to your PC:
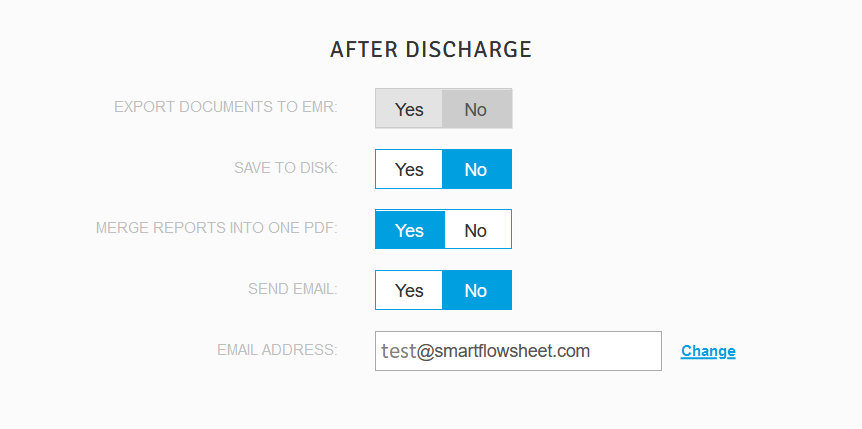
- EXPORT DOCUMENTS TO EMR: This option is available if you are already integrated with a PIMS (formerly called EMR) system (otherwise, it will be grayed out). Switching this toggle to YES allows your integrated PIMS (EMR) to receive the discharge documents from SmartFlow. Please learn more about how to set up patient records for transferring to PIMS (EMR) from THIS article.
NOTE: Some PIMS (EMRs) may not support the automatic upload of documents from SmartFlow, please check this with your PIMS (EMR) provider.
- SAVE TO DISK: Allows you to download documents to your PC automatically with the patient discharge. Set this toggle to YES to save reports to the Downloads folder on your computer, after the discharge. Please find more details on how to set up the Downloads folder HERE.
- MERGE REPORTS INTO ONE PDF: Some PIMS (EMRs) do not allow multiple file attachments at once. That's why we made it possible to merge all of the patient's documents (including Dental Chart PDF and Dental Chart Photos) into a single file by turning this switch to YES. Please learn more about how to set up patient records for transferring to PIMS (EMR) from THIS article.
Then choose which files you would like to retain after discharge:

NOTE: For a better presentation, you can customize the order the files will appear in your final report document. Click and hold the dots icon next to the document category and drag it to the desired position (see the above image).
NOTE. The time of the event specified in the reports depends on the time zone settings of the computer / iPad where the report is generated. Please make sure your devices are set to your local time zone (for details on how to do this on your iPad, see HERE).
We hope you found this information useful!
Did you find it helpful?
Yes
No
Send feedback Sorry we couldn't be helpful. Help us improve this article with your feedback.