How to create a visit through SpecVet?
Print
Modified on: Wed, 1 Jul, 2020 at 9:17 AM
A visit is basically a single admission of a pet into the hospital that doesn't require an invoice, estimates, medical records, etc. That means if a patient is discharged and two hours later, for example, comes back in to change their bandage, a new visit for that second bandage change will be created and closed when that pet walks out the door.
As soon as you have a patient created in the SpecVet system a new visit can be admitted. This can be done through the Patients section:

Once it's opened you will see the list of patients and owners previously added and saved in your account. You can also pick up the list of owners or pets separately by clicking on the corresponding icons: user icon for owners and animal icon for pets. Additionally, you can use the search bar available in the top tight corner or use an option from the pet detail search section (highlighted in yellow below) where you can enter any of the patients details: Pet Name, Contact Name, etc:
It is possible to create a new Visit from either the owners or patient's profiles:
In owner profile You can view all his/her patients listed and have an option to create a new Visit right after selecting the required patient: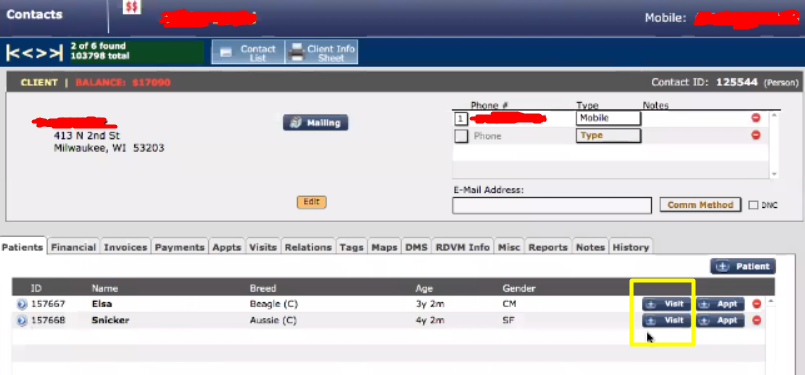 | In the patient's profile Go to the Visits tab (right under the Breed section) and click on the Visits button to create a new one:  |
NOTE: If all the required information for the patient isn't specified a new visit can't be initiated, in this case, the system will remind you to enter all details before admission (for example, it could suggest entering the Breed):
Once you've clicked the Visit button the below pop-up appears. Please note that all mandatory fields are colored in red, while it is not mandatory to fill in the others. Here you will be given the opportunity to choose:
- Specific doctor, who will automatically be attached to the department allocated in the SpecVet account (e.g. Emergency). The assigned department can be changed manually from the list: 
- Patient's weight in lbs or kg and will automatically be recalculated.
- Patient Sex.
- Code statuses with any of the three main colors corresponding to the DNR codes of the clinic: red, yellow, and green. If you are not sure which one to choose you can just provide the lead yellow code and the doctor can decide what to do with it.
- Referring DVM is this pet's general/ outpatient veterinarian. You could also attach some additional events recorded or listed together with reports received from the DVM in the two lines below the Referring DVM section.
The last few things left are:
-The Reason for visits, this could be chosen from the drop-down list
-The type of Medical issue, taking into consideration whether this is a new or existing issue, whether the patient arrived at the clinic for the first time or not.
- Referral Questions for the clinic's awareness.
As soon as you've filled all the necessary data, please enter New Visit. At this point, if your clinic is integrated with Cubex, the patient will be sent both into your dispensing machine as well as admitted to SmartFlow:

Finally, the patient will be checked into SmartFlow and Cubex successfully with all data entered. This data can then be edited in the navigation panel which is located in the Check-in window of the patient's visit (you can find out more about this HERE).
NOTE: Each action made towards the patient will initially be stored under the corresponding doctor and can be seen in the Clinical Dashboard as described in THIS article.
We hope you found this information useful!
Did you find it helpful?
Yes
No
Send feedback Sorry we couldn't be helpful. Help us improve this article with your feedback.