What are the EMR Settings?
Print
Modified on: Mon, 2 Mar, 2020 at 11:33 AM
Using the EMR Integration, you can connect SmartFlow with your Electronic Medical Record (EMR) system. For example: ezyVet, eVet Practice, RxWorks. Please see a full list of our current EMR integrations with SmartFlow HERE.
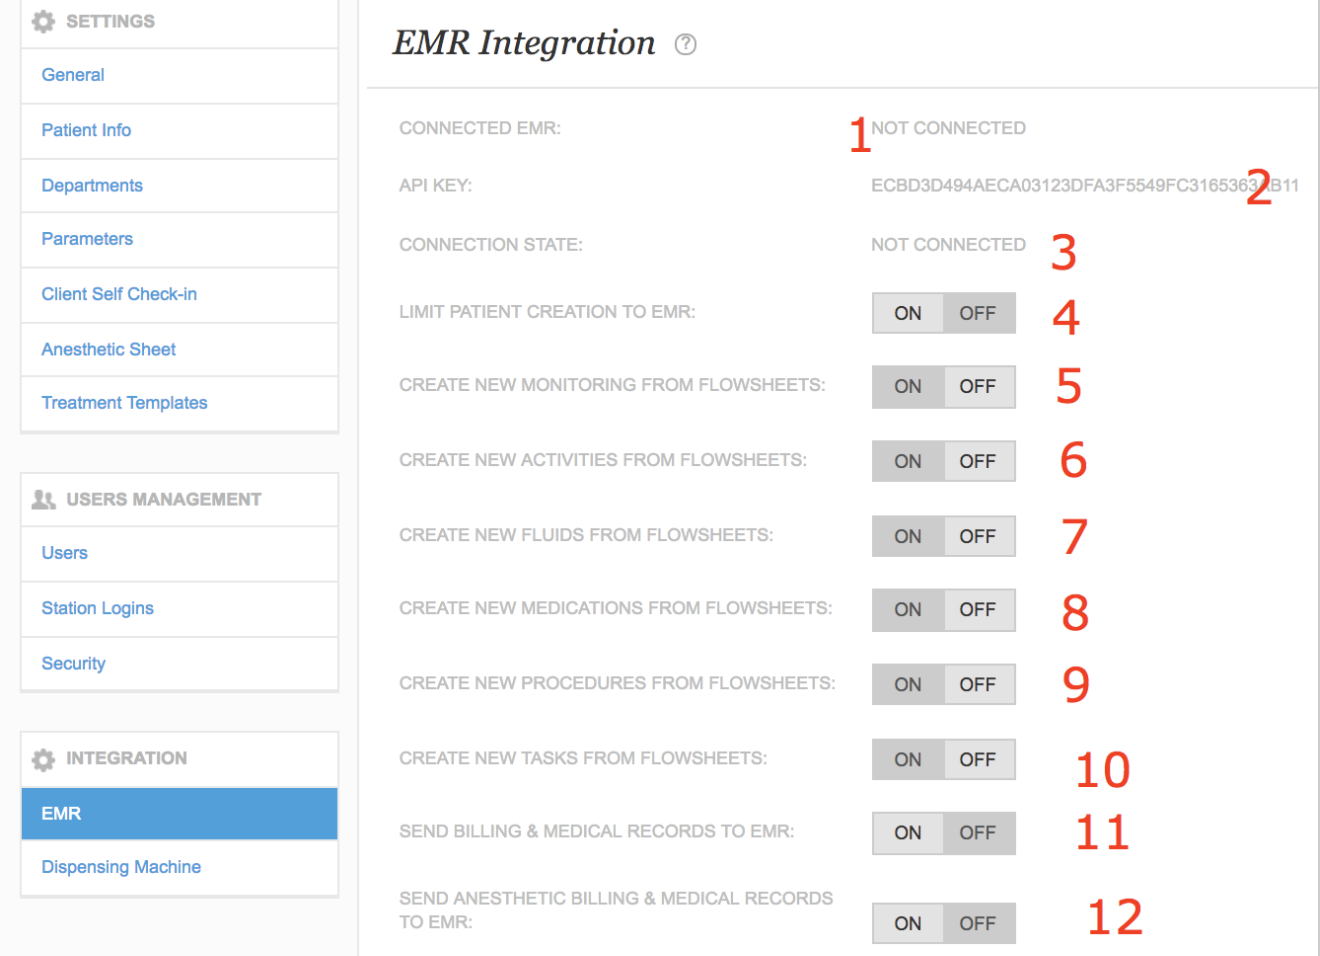
From your admin SmartFlow web account (Settings > EMR) it is possible to view all the EMR Integration Settings:

So, what do all of these options mean?
1. Connected EMR. It enables you to check whether SmartFlow is actually integrated and connected with your EMR. The snapshot below illustrates how it looks if you are connected to ezyVet:

If you are not connected to an EMR, it will simply state Not Connected. Your EMR integration should be set up and tested during the onboarding process.
2. API Key. The Application Programming Interface Key is a unique code provided by SmartFlow that can integrate the app with your EMR system. For further information about your API Key, please click HERE.
3. Connection State. This makes it possible to know if the connection between SmartFlow and your EMR is working. If you do not have an EMR, it displays Not Connected. If it is connected, it displays Accepting Patients; Accepting Inventory or Sync Patient Info. Accepting Inventory means that the next option Limit Patient Creation to EMR may be switched to OFF.
4. Limit Patient Creation to EMR. When it is set to ON, your patients need to be created in your EMR. Once you transfer the patient to SmartFlow within their department you will be able to see them in the whiteboard. If this is toggled to OFF, patients can be created from the SmartFlow web interface or iPad. This is useful if you use our Admission Forms for patient creation and your EMR supports this.
5. Create New Monitoring From Flowsheets. Switch it to ON to create new monitoring parameters directly from the flowsheet. Once this feature is switched to OFF, manager permissions will be required to add parameters to the Monitoring section of the flowsheet.
6. Create New Activities from Flowsheets. Switching it to ON allows you to create new activities like feeding or walking right from the flowsheet. If you set this to OFF, manager permissions will be required to add parameters to the Activity section of the flowsheet.
7. Create New Fluids From Flowsheets. Switch to ON for new fluid parameter creation directly from the flowsheet. If you set this to OFF, manager permissions will be required to add parameters to the Fluid section of the flowsheet.
8. Create New Medications From Flowsheets. Switch to ON for new medication creation directly from the flowsheet. If you set this to OFF, manager permissions will be required to add parameters to the Medication section of the flowsheet.
9. Create New Procedures From Flowsheets. Switch to ON for new procedures creation directly from the flowsheet. If you set this to OFF, manager permissions will be required to add parameters to the Procedure section of the flowsheet.
10. Create New Tasks From Flowsheets. Switch this to ON in order to create new tasks directly from the flowsheet. If you set this to OFF, manager permissions will be required to add Tasks/Workflow.
11. Send Billing & Medical Records to EMR. If you switch this to ON, parameters that are marked as complete on the flowsheet and mapped items will be sent to your EMR.
NOTE: Unfortunately, sometimes the switching procedure may take longer than expected. If you notice that the toggle cannot be switched and the circular arrows are rotating continuously:

Please contact our support team to make these changes on the SmartFlow side as soon as possible. Sorry for the inconvenience, we hope this will be fixed soon.
12. Send Anesthetic Billing & Medical Records to EMR. If you switch this to ON, parameters that are marked as complete on the anesthetic sheet and mapped items will be sent to your EMR.
We hope you found this information useful!
Did you find it helpful?
Yes
No
Send feedback Sorry we couldn't be helpful. Help us improve this article with your feedback.


